When you automate an Android app or game inside an emulator, the part that decides whether a flow is stable is rarely the action itself. A tap is a tap. What makes a flow reliable is how well it reads the screen before acting. That is where most people lose time: not in clicking, but in choosing the wrong kind of visual check or leaving its settings at the defaults.
This guide is a practical look at the three ways to read a screen — image, color, and text — when each one is the right tool, and how to fine-tune the detection area and action attributes so your checks hold up across runs. The examples use EmuloAgent, a Windows tool for building visual automation on Android emulators, but the reasoning applies to any visual-detection workflow.
Use automation responsibly. The same visual checks that help with app testing and repetitive validation also show up in searches for Android game automation in emulators. Always confirm the rules of the app, game, or service before you automate a routine.
The three ways to read a screen
Every reliable flow answers one question before it acts: is the screen in the state I expect? You have three signals to answer it, and they are not interchangeable. Picking the right one is the single biggest factor in how stable — and how light — your automation will be.
| Signal | Reads | Best when | Cost on your PC |
|---|---|---|---|
| Image | A visual reference (button, icon, card) | The element looks distinctive and may move | Low to medium |
| Color | A pixel or small region’s color | The state is a simple on/off, filled/empty, alert/normal | Very low |
| Text (OCR) | Words rendered on screen | The decision depends on a specific message or label | High |
The order in that table is also a good default priority: reach for color when a color answers the question, image when shape matters, and text only when nothing else captures what you need.
When to use image detection
Image detection compares what is on screen now against a reference you captured before, and continues only when the match is close enough. It is the workhorse of visual automation because most interfaces are built from distinctive visual elements.
Reach for image detection when:
- the target is a button, icon, card, or banner with a recognizable shape;
- the element can appear in different positions between runs, so fixed coordinates would break;
- you need to wait for a specific screen to finish loading before moving on;
- you want to confirm a visual state that a single color could not describe on its own.
Image detection is more forgiving than fixed coordinates and far more descriptive than color, but it does more work, so it pays to keep each reference tight and meaningful (more on that in the detection-area section below).
When color detection is the better choice
Not every check deserves the weight of an image or the cost of reading text. Often a single color already answers the question: a button turned from gray to green, a bar filled up, a status dot went red, a region changed after an action completed.
Color detection looks at one pixel or a small region and decides based on its color, with a tolerance you can adjust so small rendering differences do not trip it up. Prefer color when:
- the state is essentially binary — enabled or disabled, full or empty, alert or normal;
- you need a fast, lightweight check that can run many times without slowing the flow;
- the visual difference is mostly about color, not shape or text.
Because it is the cheapest signal, color is ideal for checks that repeat in a loop. The trade-off is precision: a color can be ambiguous if several screen states share the same tone. When that happens, combine color with an image check, or move the test to where the color is unique.
When to use text detection — and why to use it sparingly
Text detection (OCR) reads the actual words on screen. It is the most expressive signal: it can tell a success message from an error, pick a button by its label, confirm a screen loaded the expected content, or branch the flow based on what a notification says.
Use text detection for cases like:
- waiting for a specific message (“Completed”, “Try again”, “Connected”) before continuing;
- choosing different paths depending on what the screen says;
- confirming a screen loaded the right content, not just the right layout;
- reading a label when the same button can show different text.
The caution: OCR is by far the heaviest check on your machine. Reading text means analyzing a region pixel by pixel, and doing that repeatedly — especially in a tight loop or across several emulator instances at once — uses noticeably more CPU than image or color checks. On a busy PC, careless OCR is the most common cause of a flow that feels slow or makes the emulator stutter.
You do not have to avoid text detection — you have to use it deliberately:
- Restrict it to a small region. Never run OCR over the whole screen when the text lives in one corner. A tight area is faster and more accurate.
- Don’t poll it constantly. Gate the text check behind a cheaper one first — wait for an image or color to confirm the screen is ready, then read the text once.
- Prefer image or color when they would answer the same question. If a button’s color already tells you it is active, you do not need to read its label.
The detection area is your biggest reliability lever
The setting that most improves detection — for all three signals — is also the one most people skip: the detection area, or region of interest. By default a check may look across a large part of the screen. Narrowing it to just the spot where the element actually appears changes everything.
Restricting the detection area:
- raises accuracy — fewer competing elements means fewer false matches;
- speeds up every check — less of the screen to analyze, which matters most for OCR;
- reduces noise — backgrounds, animations, and ads outside the region stop interfering;
- makes flows portable — a tight region tied to where the element lives survives small layout shifts better than a guess across the whole screen.
A simple habit: after a check works, shrink its area to the smallest box that still contains the target with a little margin. You will usually see both accuracy and speed improve at the same time.
Tuning sensitivity and tolerance
Two dials control how strict a check is, and the right setting is rarely the extreme:
- Image sensitivity (match score). Too strict and a tiny rendering difference makes the element “disappear”; too loose and the wrong element passes. Start near the middle, then tighten only if you see false matches, or relax slightly if a valid element is sometimes missed.
- Color tolerance. A little tolerance absorbs antialiasing, theme variation, and compression artifacts. Zero tolerance is fragile; too much tolerance makes different states look identical. Widen it just until the real state is caught consistently, no further.
The goal with both is the widest setting that still tells your states apart — strict enough to be correct, loose enough to survive normal rendering differences.
Action attributes: small settings, big difference
Once a check passes, the action runs — and actions have attributes worth tuning too. Treating every tap as a plain single click leaves a lot of reliability on the table.
- Change the click style to match the gesture. A single click is not always right. A double click opens or confirms in many UIs; a long press triggers context menus, selection, or hold-to-act controls; a repeated click handles counters and increment buttons. Matching the click style to what the interface actually expects is often the fix for a step that “clicks but nothing happens.”
- Use swipes for movement, not a chain of taps. Scrolling lists, carousels, and sliders respond to a swipe with a direction and distance — far more reliable than guessing intermediate tap points.
- Prefer dynamic waits over fixed ones. A fixed pause is a guess that is either too short (the flow races ahead) or too long (it wastes time). Waiting for a signal — an image, a color, a message — adapts to how fast the screen actually responds.
- Use Android events for navigation. Back, home, and recent apps are cleaner and more portable than hunting for an on-screen button that may move between devices.
- Map the virtual keyboard for controlled input. For numeric entry — and especially shuffled keypads where digit positions change — mapping keyboard points by visual position is more dependable than assuming a fixed layout.
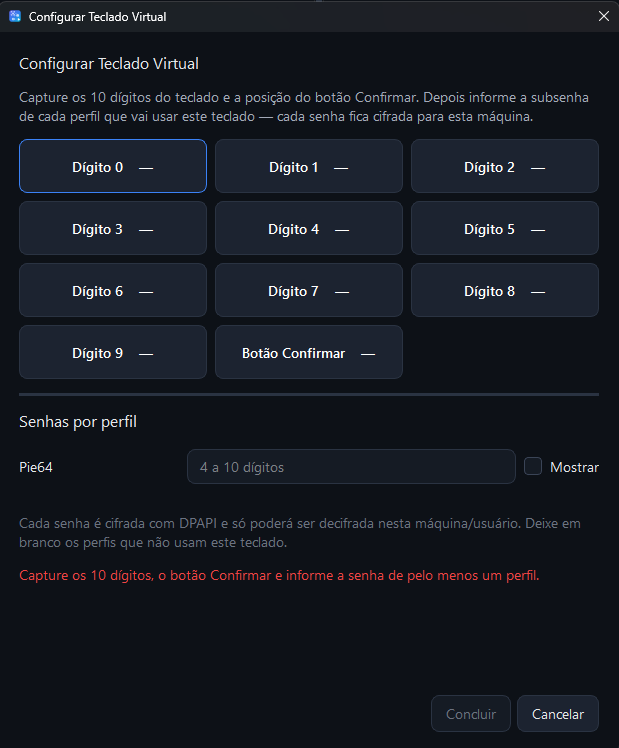
The screen above shows EmuloAgent’s virtual keyboard setup, with captured keys and confirmation — a good example of tuning an action’s attributes to match how the interface really behaves, instead of forcing a generic click.
Combine signals for flows that don’t break
The most resilient flows rarely rely on a single check. They layer signals so each one covers the other’s blind spot:
- Use a cheap color or image check to confirm the screen is ready.
- Run OCR once, in a small region, only when the message actually matters.
- Branch the flow on the result, and fall back to a wait-and-retry when nothing matches.
- Keep visual references and regions organized by profile, since emulators like MuMu Player, BlueStacks, LDPlayer, and Nox differ in resolution, scale, and rendering.
Profiles matter here: a check that is perfectly tuned in one instance can drift in another if the resolution or scale differs. Keeping references and regions per profile keeps a flow honest across environments — which is exactly what app and game testing across multiple configurations needs.
Quick reference
- Color for simple on/off states and anything in a tight loop — it is the lightest check.
- Image when shape matters or the element moves — the dependable default.
- Text (OCR) only when a specific message drives the decision — keep its region small and don’t poll it.
- Shrink the detection area before touching anything else; it raises accuracy and speed at once.
- Tune sensitivity and tolerance to the widest setting that still separates your states.
- Match the click style — single, double, long, or repeated — to what the interface expects.
- Wait for signals, not fixed timers, and organize everything by emulator profile.
Conclusion
Reliable Android emulator automation is less about adding steps and more about reading the screen well. Choose color when a color answers the question, image when shape matters, and text only when the words drive the decision — then tighten the detection area, tune the dials, and pick the right action attributes. Those small adjustments are what separate a flow that breaks on the second run from one that holds up across machines and configurations.
EmuloAgent brings image recognition, color detection, OCR, adjustable detection regions, and configurable actions into a single visual Windows experience, with profiles and cloud sync to keep tests and automations organized. Explore the EmuloAgent product page or get the app from the Microsoft Store.